


PHP のOData SDK を使用したAPI のデータのクエリ

CData API Server は、ADO.NET Provider for API(またはその他の250+ ADO.NET Providers のデータ)と組み合わせることでWeb サービスとしてAPI のデータを公開します。下記の手順に従って、API のデータをオブジェクトとして使用します。
API Server の設定
以下のリンクからAPI Server の無償トライアルをスタートしたら、セキュアなAPI OData サービスを作成していきましょう。
API への接続
PHP からAPI のデータを操作するには、まずyour API への接続を作成・設定します。
- API Server にログインして、「Connections」をクリック、さらに「接続を追加」をクリックします。
- 「接続を追加」をクリックして、データソースがAPI Server に事前にインストールされている場合は、一覧から「API」を選択します。
- 事前にインストールされていない場合は、コネクタを追加していきます。コネクタ追加の手順は以下の記事にまとめてありますので、ご確認ください。
CData コネクタの追加方法はこちら >> - それでは、API への接続設定を行っていきましょう!
-
To connect to your API, configure the following properties on the Global Settings page:
- In Authentication, select the Type and fill in the required properties
- In Headers, add the required HTTP headers for your API
- In Pagination, select the Type and fill in the required properties
After the configuring the global settings, navigate to the Tables to add tables. For each table you wish to add:
- Click "+ Add"
- Set the Name for the table
- Set Request URL to the API endpoint you wish to work with
")
- (Optional) In Parameters, add the required URL Parameters for your API endpoint
- (Optional) In Headers, add the required HTTP headers for the API endpoint
- In Table Data click " Configure"
- Review the response from the API and click "Next"
")
- Select which element to use as the Repeated Elements and which elements to use as Columns and click "Next"
")
- Preview the tabular model of the API response and click "Confirm"
")
- 接続情報の入力が完了したら、「保存およびテスト」をクリックします。
To connect to your API, configure the following properties on the Global Settings page:
- In Authentication, select the Type and fill in the required properties
- In Headers, add the required HTTP headers for your API
- In Pagination, select the Type and fill in the required properties
After the configuring the global settings, navigate to the Tables to add tables. For each table you wish to add:
- Click "+ Add"
- Set the Name for the table
- Set Request URL to the API endpoint you wish to work with
- (Optional) In Parameters, add the required URL Parameters for your API endpoint
- (Optional) In Headers, add the required HTTP headers for the API endpoint
- In Table Data click " Configure"
- Review the response from the API and click "Next"
- Select which element to use as the Repeated Elements and which elements to use as Columns and click "Next"
- Preview the tabular model of the API response and click "Confirm"
API Server のユーザー設定
次に、API Server 経由でAPI にアクセスするユーザーを作成します。「Users」ページでユーザーを追加・設定できます。やってみましょう。
- 「Users」ページで ユーザーを追加をクリックすると、「ユーザーを追加」ポップアップが開きます。
-
次に、「ロール」、「ユーザー名」、「権限」プロパティを設定し、「ユーザーを追加」をクリックします。

-
その後、ユーザーの認証トークンが生成されます。各ユーザーの認証トークンとその他の情報は「Users」ページで確認できます。

API 用のAPI エンドポイントの作成
ユーザーを作成したら、API のデータ用のAPI エンドポイントを作成していきます。
-
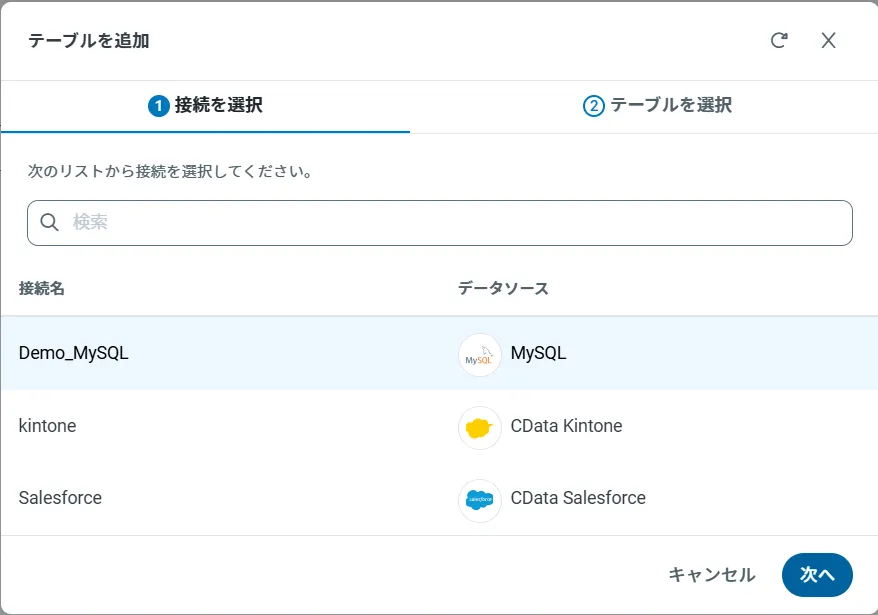
まず、「API」ページに移動し、
「 テーブルを追加」をクリックします。
-
アクセスしたい接続を選択し、次へをクリックします。
-
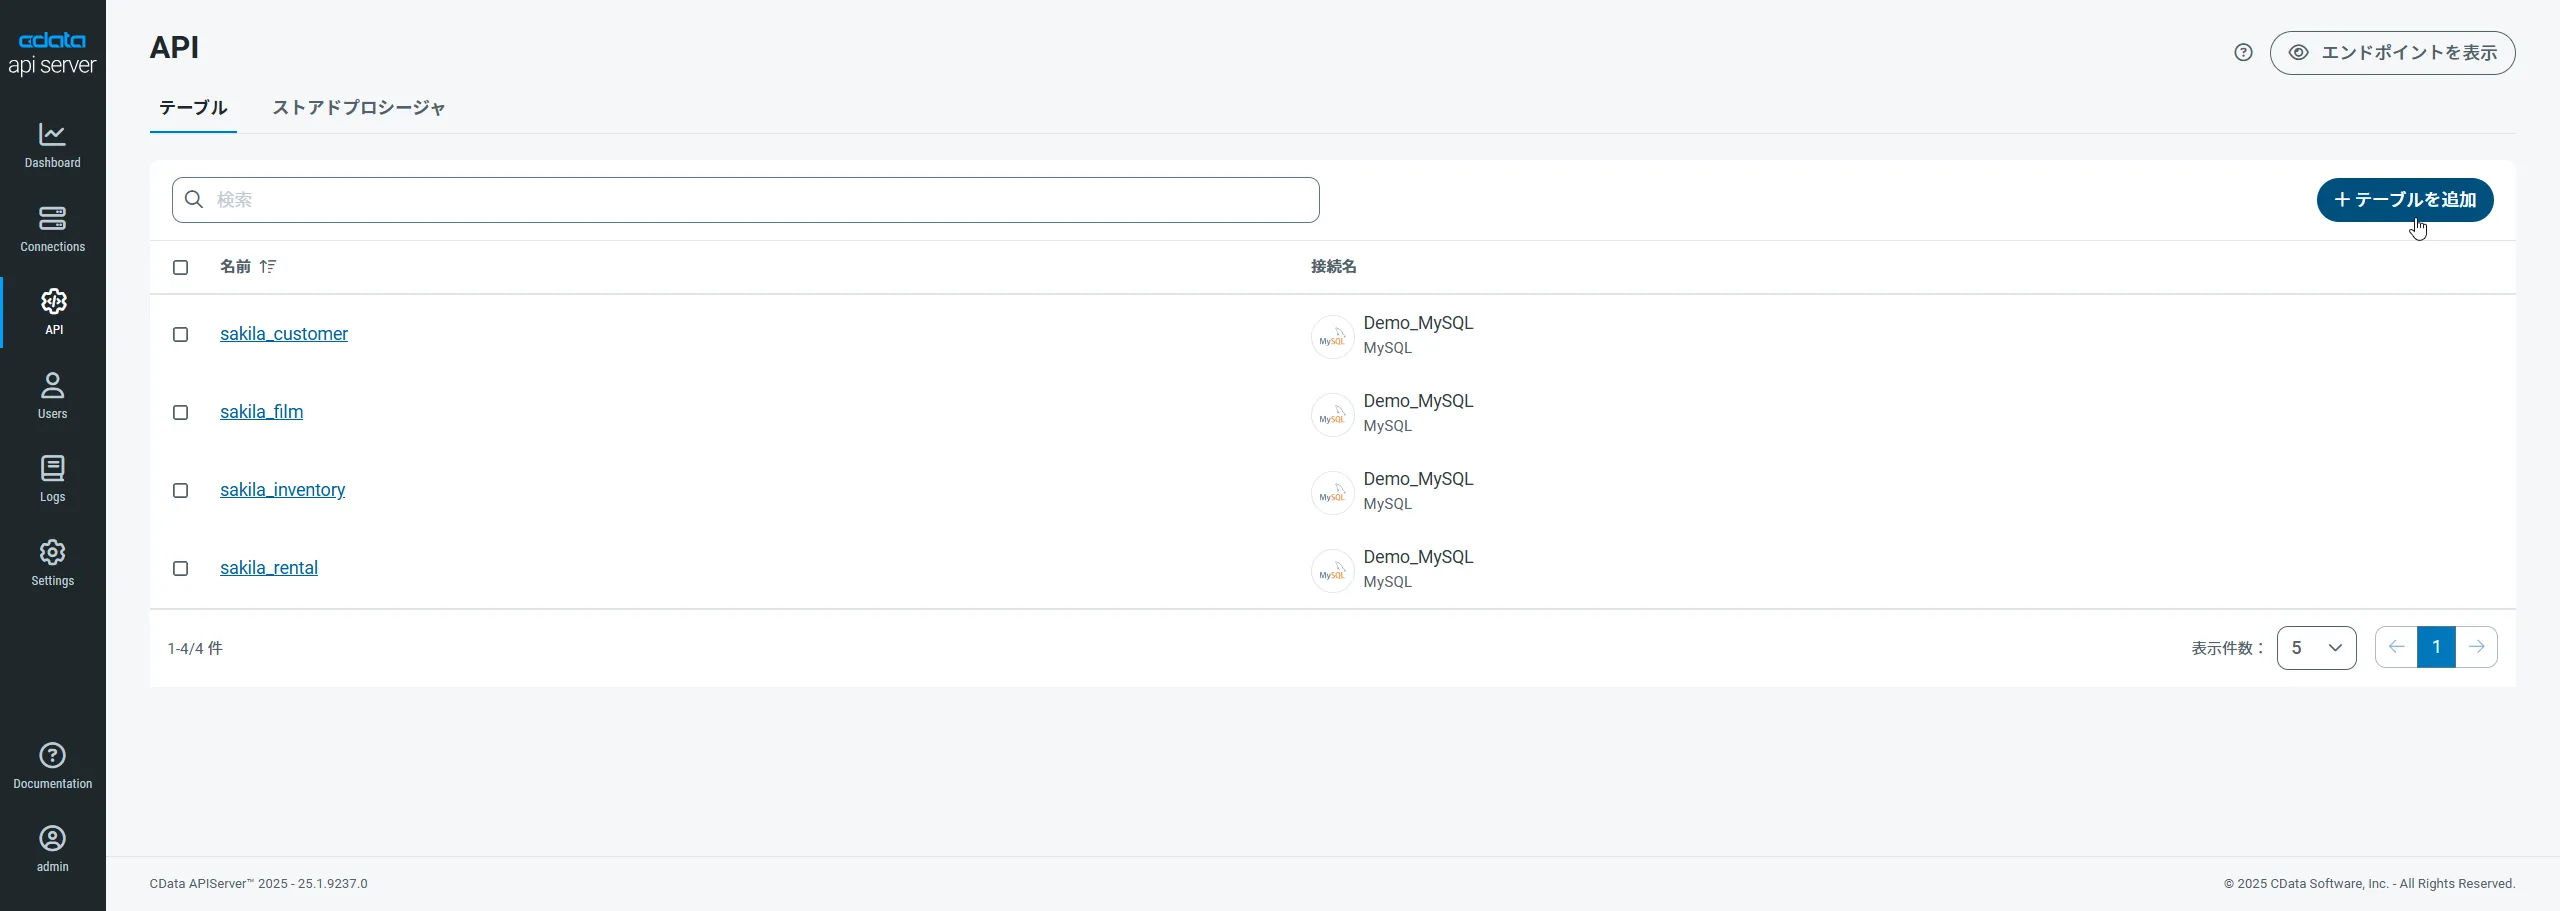
接続を選択した状態で、各テーブルを選択して確認をクリックすることでエンドポイントを作成します。

OData のエンドポイントを取得
以上でAPI への接続を設定してユーザーを作成し、API Server でAPI データのAPI を追加しました。これで、OData 形式のAPI データをREST API で利用できます。API Server の「API」ページから、API のエンドポイントを表示およびコピーできます。

To connect to your API, configure the following properties on the Global Settings page:
- In Authentication, select the Type and fill in the required properties
- In Headers, add the required HTTP headers for your API
- In Pagination, select the Type and fill in the required properties
After the configuring the global settings, navigate to the Tables to add tables. For each table you wish to add:
- Click "+ Add"
- Set the Name for the table
- Set Request URL to the API endpoint you wish to work with
- (Optional) In Parameters, add the required URL Parameters for your API endpoint
- (Optional) In Headers, add the required HTTP headers for the API endpoint
- In Table Data click " Configure"
- Review the response from the API and click "Next"
- Select which element to use as the Repeated Elements and which elements to use as Columns and click "Next"
- Preview the tabular model of the API response and click "Confirm"
さらに、OData SDK for PHP との互換性のためにAPI Server を構成します。「Settings」をクリックし、OData セクションで「デフォルトバージョン」を2.0 に設定します。
API Server に接続するユーザーの認証トークンを取得
作成するOData サービスを決定したら、「Users」をクリックして任意のユーザーをクリックし、ユーザーの認証トークンを取得します。API Server は、認証トークンベースの認証を使用して、主要な認証スキームをサポートします。SSL を使用すれば、接続の認証だけでなく、暗号化も可能です。IP アドレスを使用してアクセスを制限することも可能です。デフォルトでは、ローカルマシンからの接続のみが許可されます。
わかりやすくするために、URL に認証トークンを設定してAPI Server への認証を行います。これはデフォルトでは有効になっていないため、API Server の構成ファイルであるsettings.cfg に以下の行を追加する必要があります。
[Application]
AllowAuthTokenInUrl = true
settings.cfg ファイルはデータディレクトリに配置されています。.NET 版では、www の下のapp_data フォルダがデータディレクトリになっています。Java 版でのデータディレクトリの位置は、OS によって変わります。
- Windows:C:\ProgramData\CData\API\
- Unix or Mac OS X:~/cdata/API/
API エンティティをPHP オブジェクトとして使用する
以下のステップに従ってOData PHP SDK を使用し、API Server によって公開されるWeb サービスに接続するプロキシクラスを作成します。
-
以下のようなコマンドにURL を渡します。
php C:\PHPLib\ODataphp\PHPDataSvcUtil.php /uri=https://your-server:8032/api.rsc/@your-authtoken/ /out=C:\PHPLib\ODataphp\APIEntities.php
上記のコマンドは、OData エンドポイントからのレスポンスで返されたメタデータからクラスを定義し、指定したフォルダにクラス定義を出力します。
API Server とOData SDK for PHP は、フォーム認証とWindows 認証をサポートします。API Server は、認証トークンを使用してOData エンドポイントへのアクセスを許可されたユーザーを認証します。HTTP Basic 認証で認証トークを指定するか、OData URL に追加することができます。
許可されたユーザーは、API Server の「Users」セクションで設定できます。
-
PHP のオブジェクト指向インターフェースを使用して、API のデータへのアクセスを開始できます。以下のコードは、posts テーブルのレコードを作成し、リアルタイムデータを取得して、新しく作成されたレコードを表示します。
require_once 'APIEntities.php';
try{
  $svc = new CData();
  $posts = new posts();
  $posts->userId = '12345';
  $svc->AddToposts($posts);
  $svc->SetSaveChangesOptions(SaveChangesOptions::None);
  $svc->SaveChanges();
  $response = $svc->posts()->Execute();
  foreach($response->Result as $posts)
    echo $posts->title."";
} catch (Exception $e) {    //catch errors from the API Server
  echo $e->getError(), "\n";
}