


【ノーコード】RunMyProcess からAPI Server 経由でAPI のデータと連携

Akorbi Digital RunMyProcess を使えば、予算申請や契約管理など複雑なビジネスプロセスをノーコードでアプリ化できます。CData API Server はAPI の仮想データベースを作成して、API のOData API(RunMyProcess でネイティブに使用可能)を生成するために使用します。RunMyProcess をCData API Server と連携することで、対応するすべてのSaaS、Big Data、およびNoSQL ソースへ接続でき、API のデータに素早くアクセスできます。
この記事では、二つのステップでAPI のデータへの接続方法を説明します。
- API Server からAPI への接続
- RunMyProcess からAPI Server に接続してAPI のデータを取得
API Server の設定
以下のリンクからAPI Server の無償トライアルをスタートしたら、セキュアなAPI OData サービスを作成していきましょう。
API への接続
RunMyProcess からAPI のデータを操作するには、まずyour API への接続を作成・設定します。
- API Server にログインして、「Connections」をクリック、さらに「接続を追加」をクリックします。
- 「接続を追加」をクリックして、データソースがAPI Server に事前にインストールされている場合は、一覧から「API」を選択します。
- 事前にインストールされていない場合は、コネクタを追加していきます。コネクタ追加の手順は以下の記事にまとめてありますので、ご確認ください。
CData コネクタの追加方法はこちら >> - それでは、API への接続設定を行っていきましょう!
-
To connect to your API, configure the following properties on the Global Settings page:
- In Authentication, select the Type and fill in the required properties
- In Headers, add the required HTTP headers for your API
- In Pagination, select the Type and fill in the required properties
After the configuring the global settings, navigate to the Tables to add tables. For each table you wish to add:
- Click "+ Add"
- Set the Name for the table
- Set Request URL to the API endpoint you wish to work with
")
- (Optional) In Parameters, add the required URL Parameters for your API endpoint
- (Optional) In Headers, add the required HTTP headers for the API endpoint
- In Table Data click " Configure"
- Review the response from the API and click "Next"
")
- Select which element to use as the Repeated Elements and which elements to use as Columns and click "Next"
")
- Preview the tabular model of the API response and click "Confirm"
")
- 接続情報の入力が完了したら、「保存およびテスト」をクリックします。
To connect to your API, configure the following properties on the Global Settings page:
- In Authentication, select the Type and fill in the required properties
- In Headers, add the required HTTP headers for your API
- In Pagination, select the Type and fill in the required properties
After the configuring the global settings, navigate to the Tables to add tables. For each table you wish to add:
- Click "+ Add"
- Set the Name for the table
- Set Request URL to the API endpoint you wish to work with
- (Optional) In Parameters, add the required URL Parameters for your API endpoint
- (Optional) In Headers, add the required HTTP headers for the API endpoint
- In Table Data click " Configure"
- Review the response from the API and click "Next"
- Select which element to use as the Repeated Elements and which elements to use as Columns and click "Next"
- Preview the tabular model of the API response and click "Confirm"
API Server のユーザー設定
次に、API Server 経由でAPI にアクセスするユーザーを作成します。「Users」ページでユーザーを追加・設定できます。やってみましょう。
- 「Users」ページで ユーザーを追加をクリックすると、「ユーザーを追加」ポップアップが開きます。
-
次に、「ロール」、「ユーザー名」、「権限」プロパティを設定し、「ユーザーを追加」をクリックします。

-
その後、ユーザーの認証トークンが生成されます。各ユーザーの認証トークンとその他の情報は「Users」ページで確認できます。

API 用のAPI エンドポイントの作成
ユーザーを作成したら、API のデータ用のAPI エンドポイントを作成していきます。
-
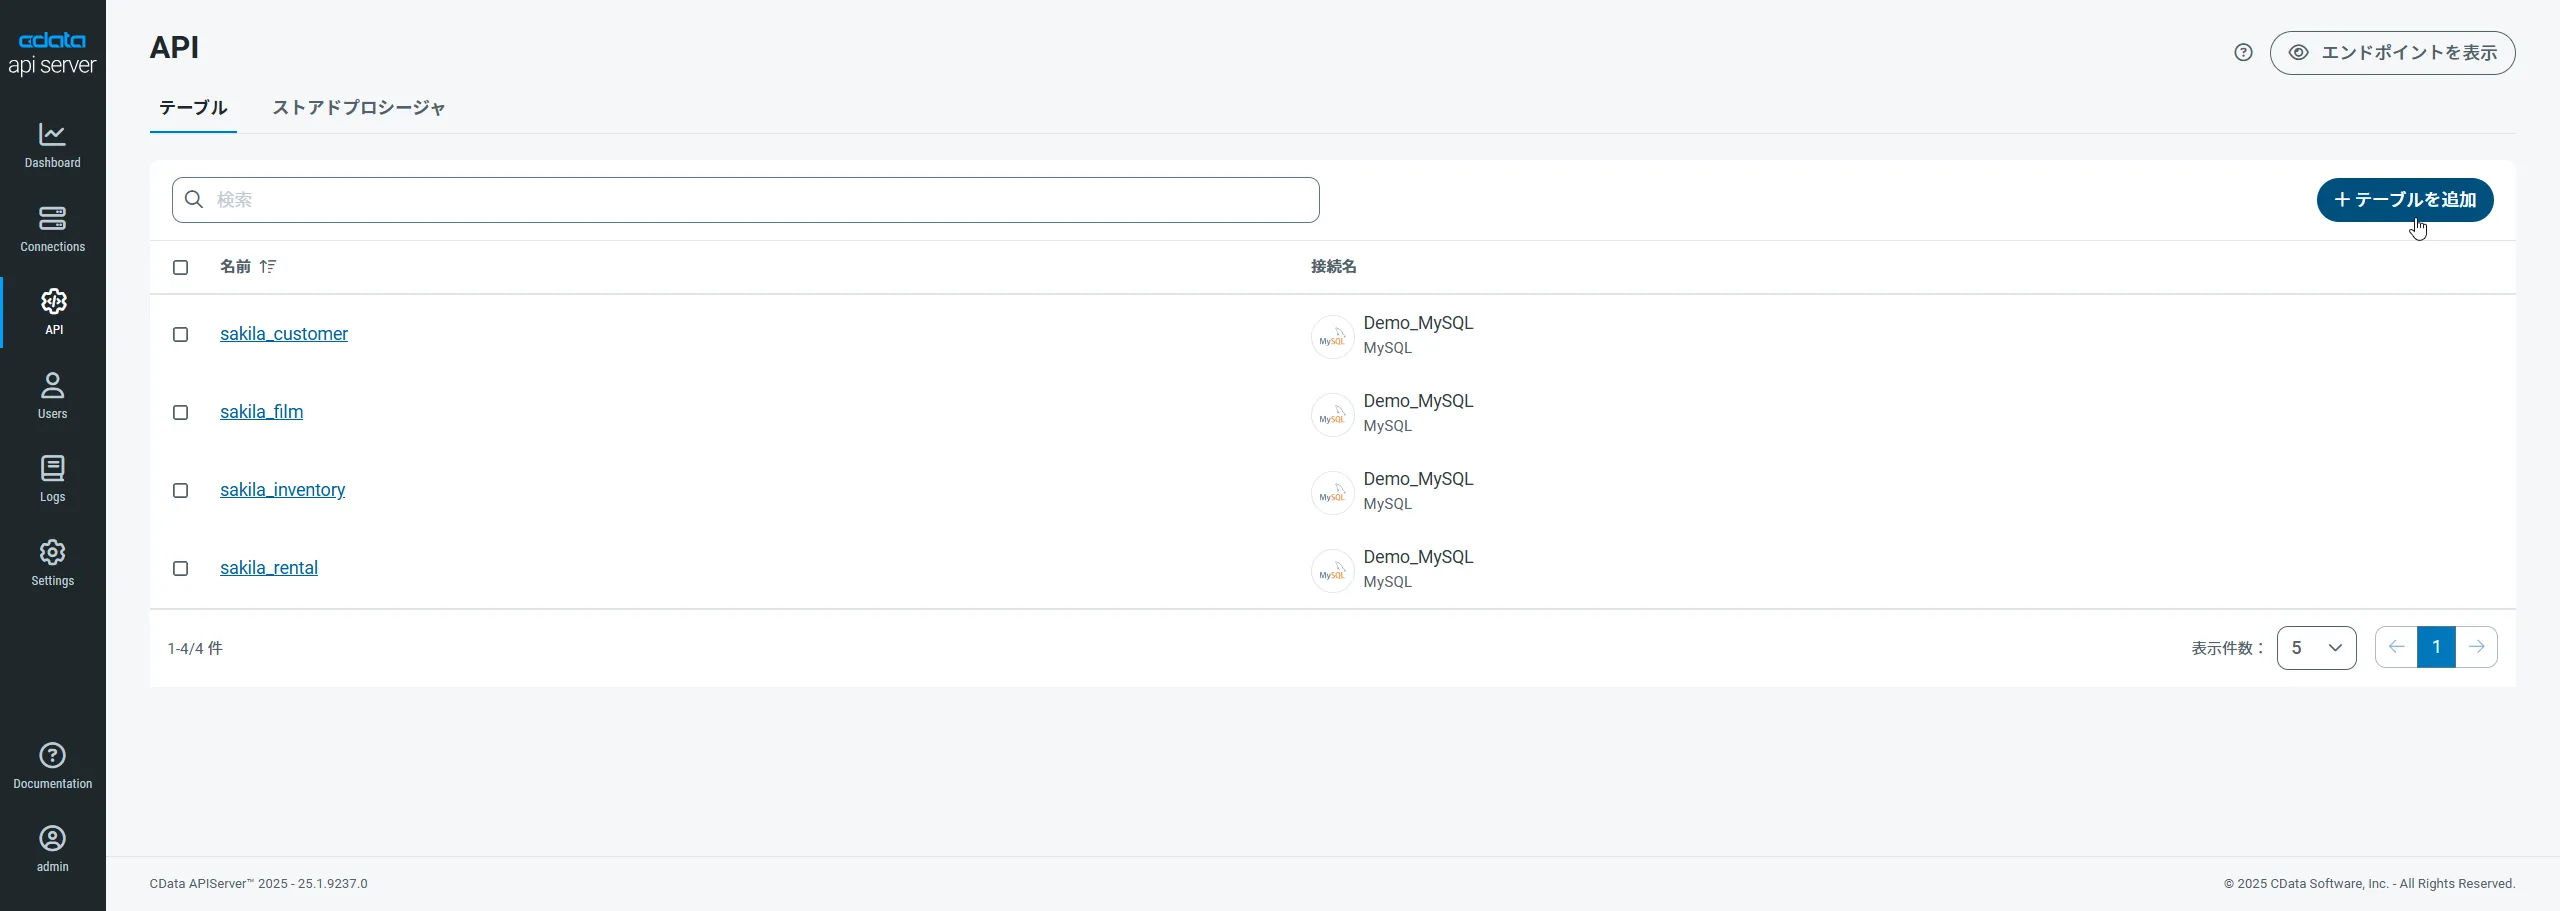
まず、「API」ページに移動し、
「 テーブルを追加」をクリックします。
-
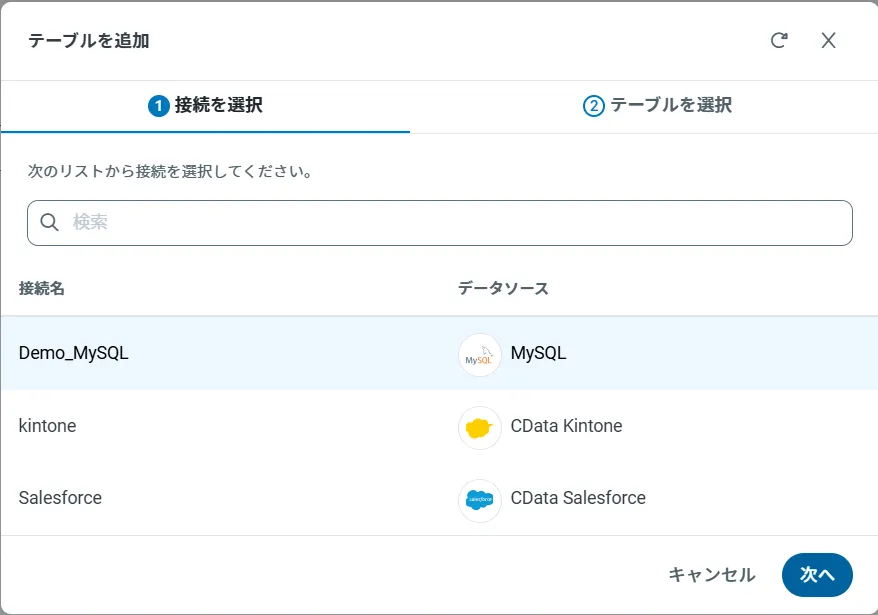
アクセスしたい接続を選択し、次へをクリックします。
-
接続を選択した状態で、各テーブルを選択して確認をクリックすることでエンドポイントを作成します。

OData のエンドポイントを取得
以上でAPI への接続を設定してユーザーを作成し、API Server でAPI データのAPI を追加しました。これで、OData 形式のAPI データをREST API で利用できます。API Server の「API」ページから、API のエンドポイントを表示およびコピーできます。

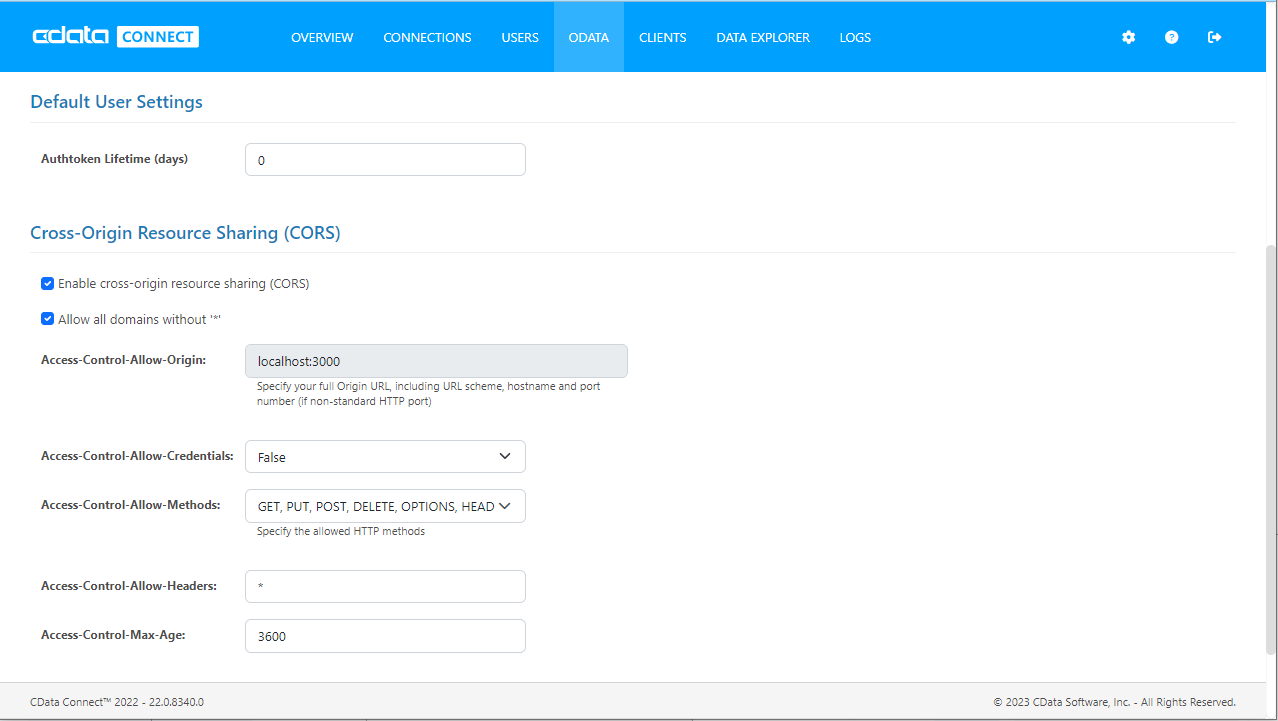
(オプション)Cross-Origin Resource Sharing (CORS) を構成
Ajax などのアプリケーションから複数のドメインにアクセスして接続すると、クロスサイトスクリプティングの制限に違反する恐れがあります。その場合には、[OData]->[Settings]でCORS 設定を構成します。
- Enable cross-origin resource sharing (CORS):ON
- Allow all domains without '*':ON
- Access-Control-Allow-Methods:GET, PUT, POST, OPTIONS
- Access-Control-Allow-Headers:Authorization
設定への変更を保存します。
RunMyProcess DigitalSuite Studio からAPI のデータにアクセス
API への接続とOData エンドポイントがあれば、RunMyProcess からAPI のデータにアクセスできます。
Provider の作成
- RunMyProcess にログインして、「DigitalSuite Studio」を開きます。
- 「Resources」をクリックしてリソースページを表示したら、「CONNECTORS」タブを選択すると次のような画面が表示されます。
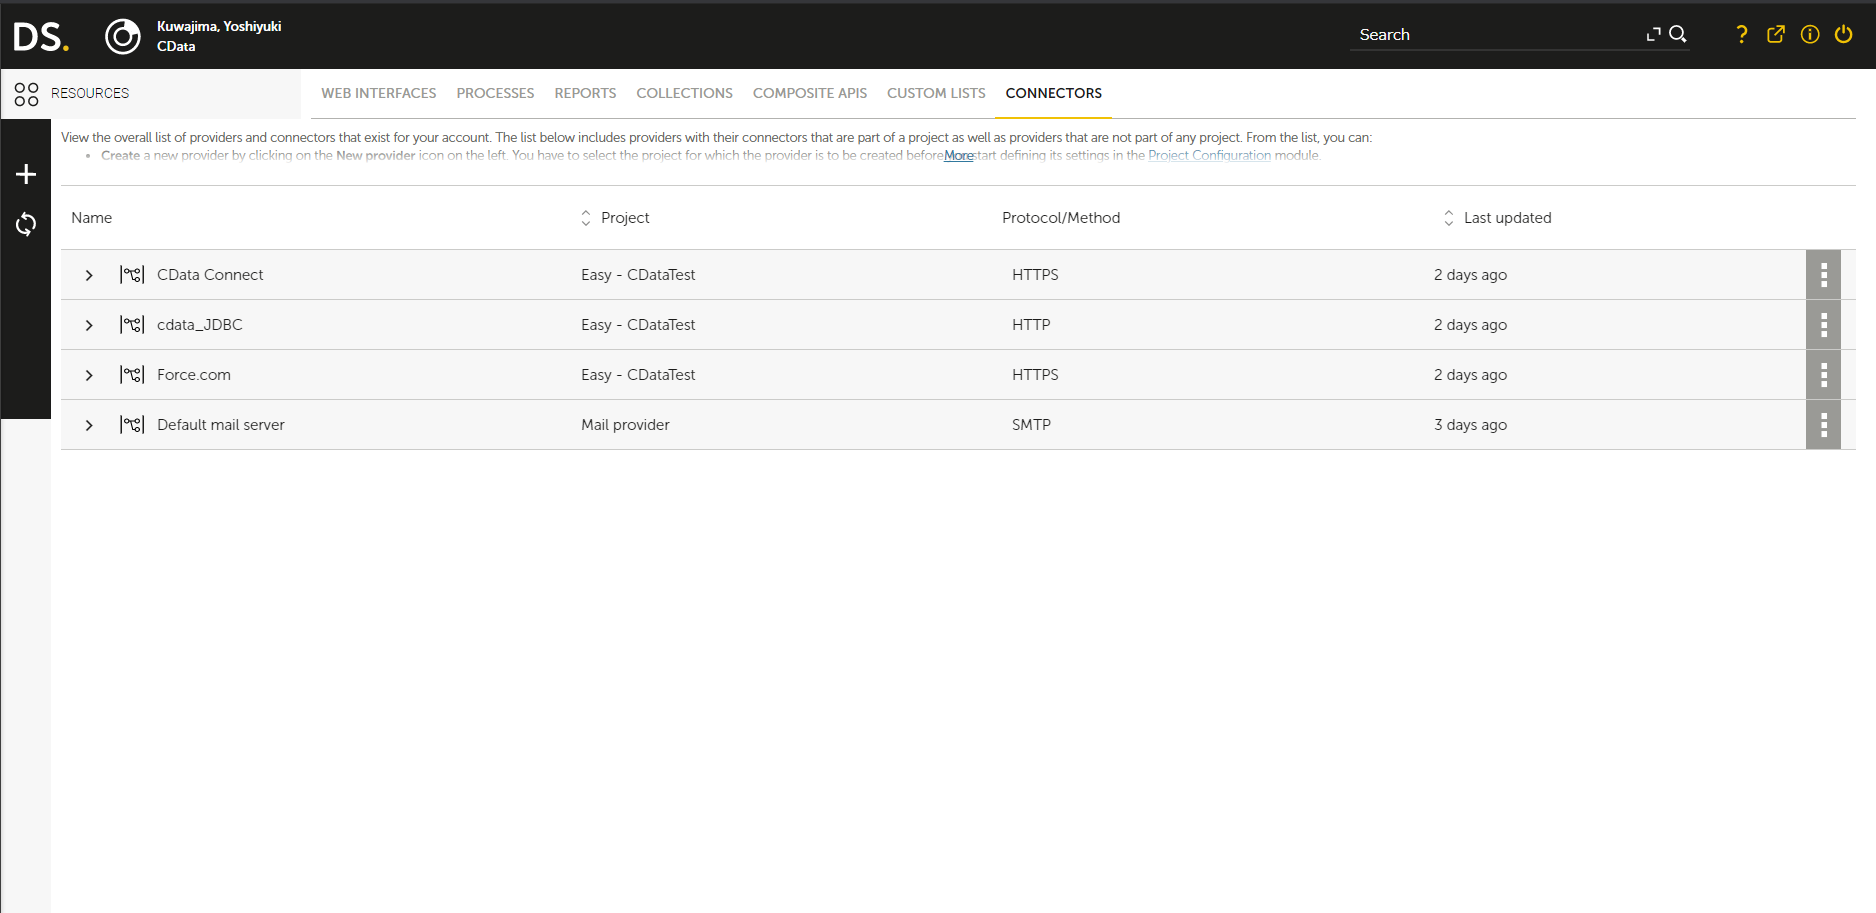
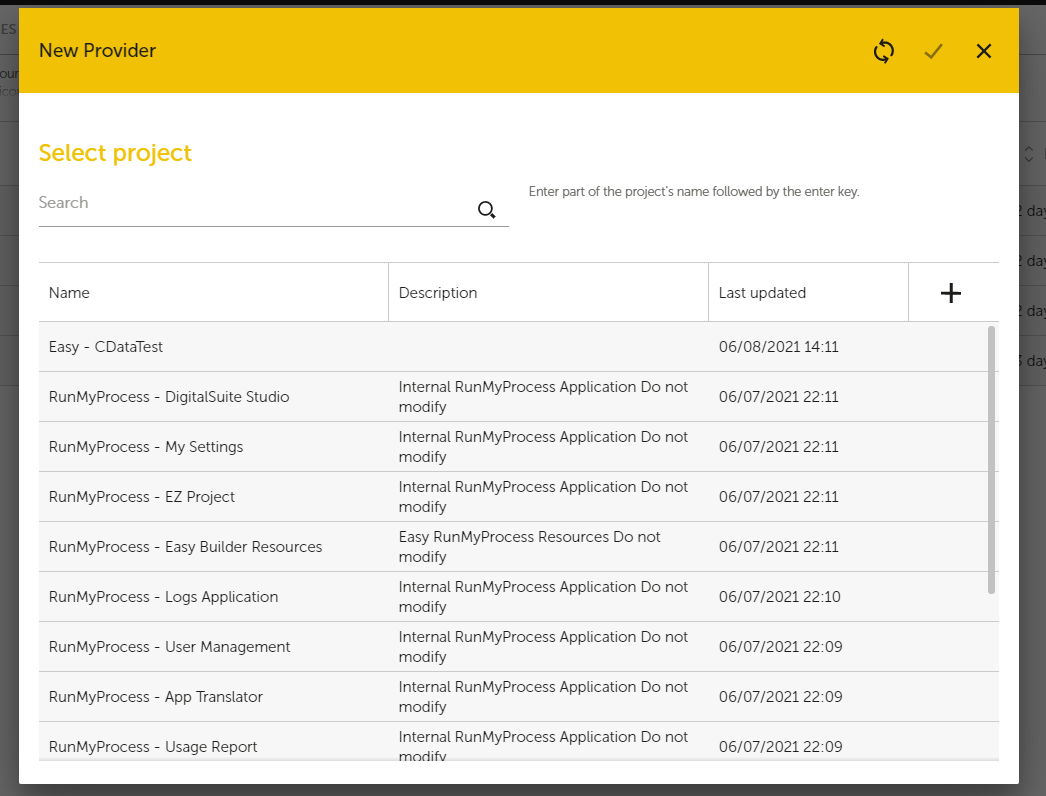
- 「+」(New Provider)ボタンをクリックすると新規プロバイダー作成用の画面が表示されるので、リソースを使用するプロジェクトを選択して、「Confirm」ボタンをクリックします。
- プロバイダーの設定画面が表示されるので、次の情報を入力します。
- URL:API Server の「API」ページにある、次のOData エンドポイントを指定します。https://myserver/api.rsc/
- Authentication Schema:「Login/Password」を指定します。
- Login:設定したAPI Server のユーザー名を指定します。
- Password:上記のユーザー用のAuthtoken に設定します。
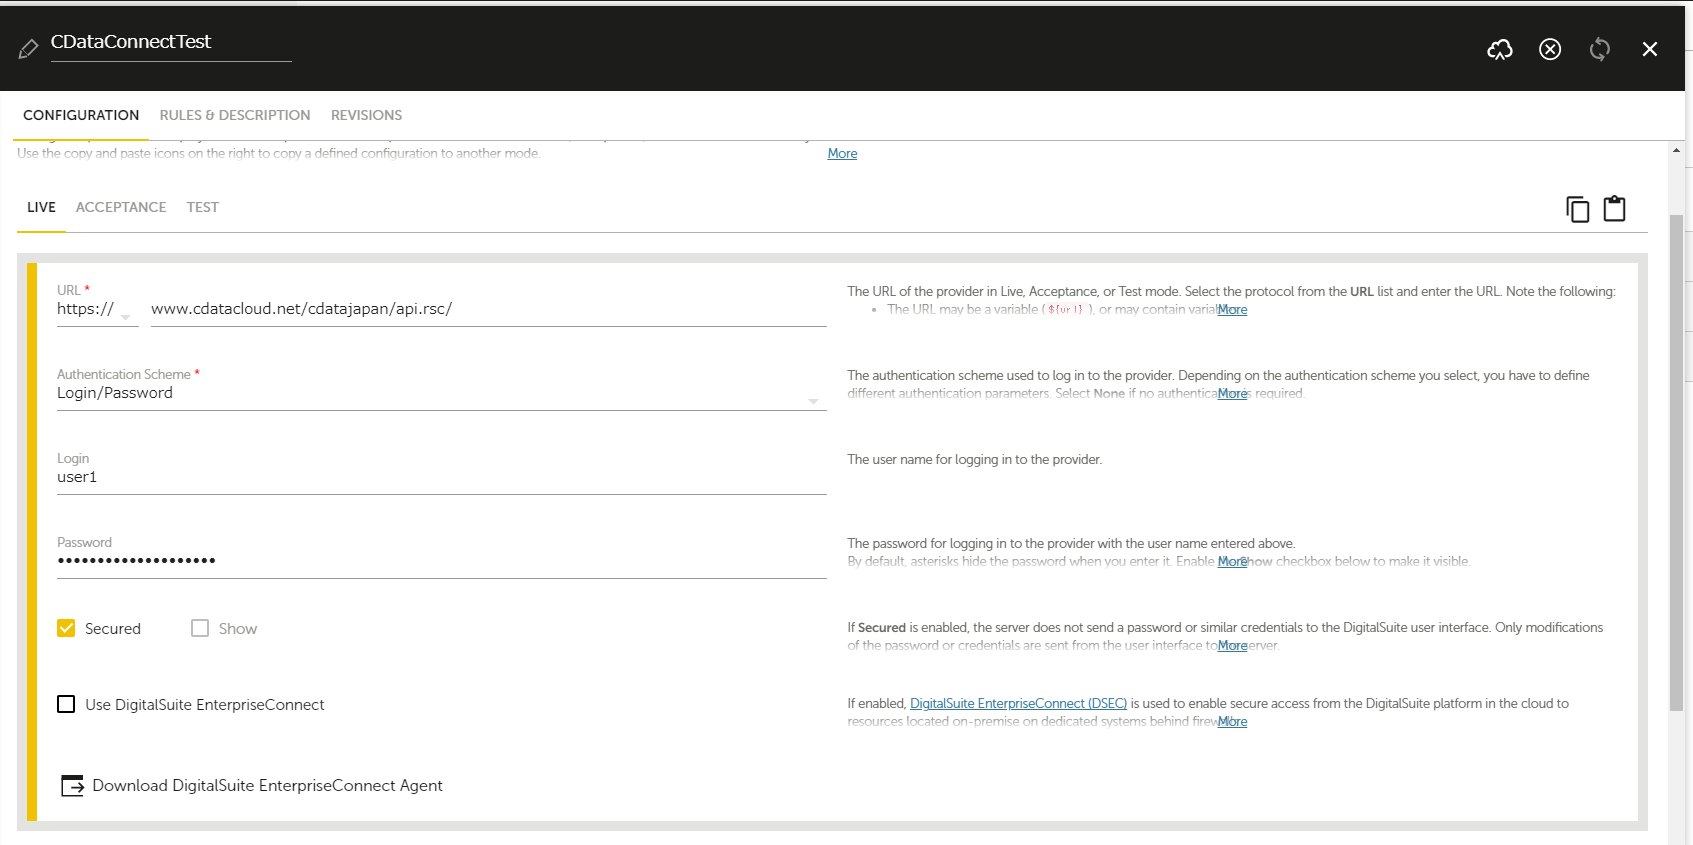
- 「ACCEPTANCE」、「TEST」タブにも同じ情報を入力します。Note:その際、右上の「Copy this configuration」ボタンをクリックすることで設定をコピーでき、コピー先のタブで「Paste previously copied configuration」ボタンをクリックすることで既存の設定を反映できます。
- 完了したら、「Save」をクリックして保存します。
Connector を作成してAPI のデータを取得
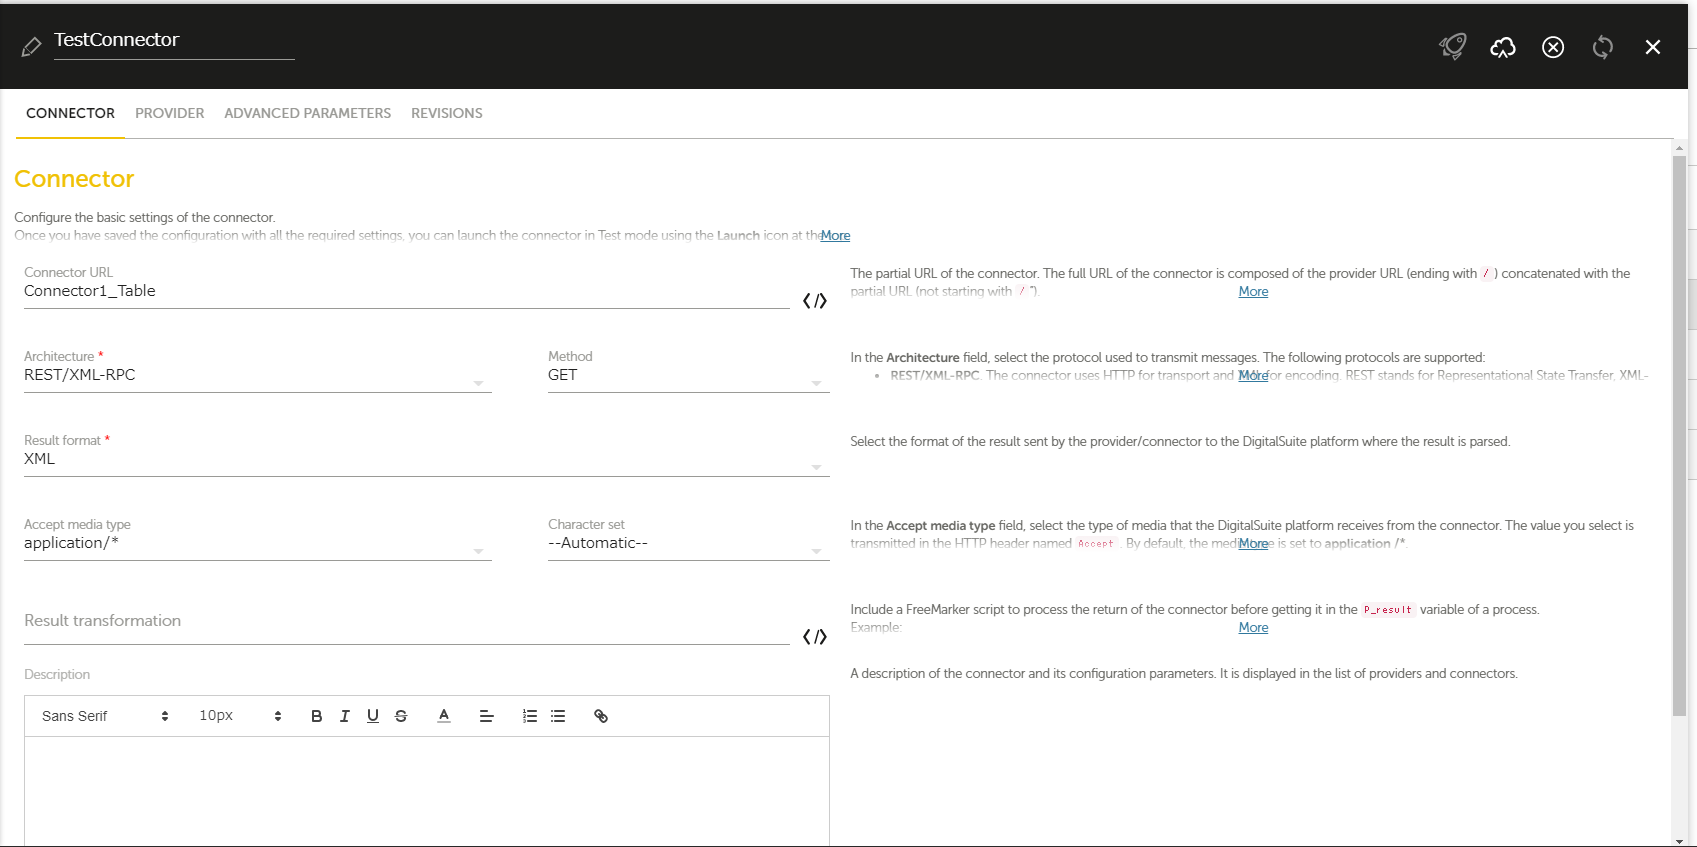
- 次に「CONNECTORS」タブから、作成したプロバイダーの右端のボタンをクリックして、メニューから「Add connector」を選択します。
- 次のような画面が表示されるので、「Connector URL」にAPI Server で設定したテーブルのOData エンドポイントを指定します。例:odataendpoint/
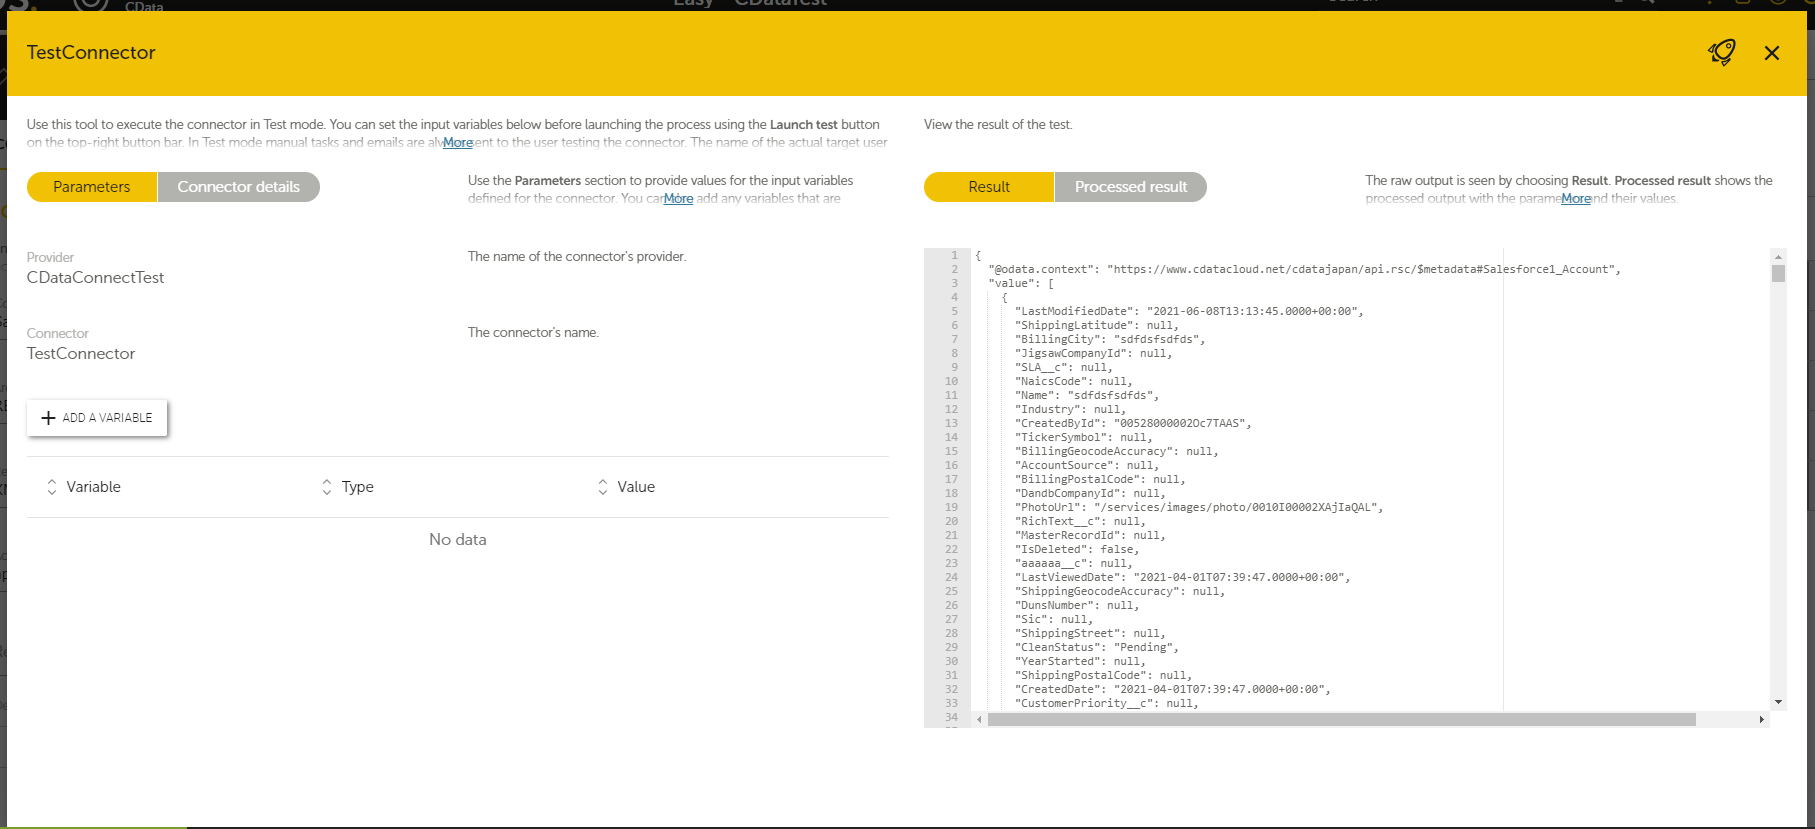
- 入力したら右上の「Save」ボタンをクリックしたあと、「Launch」ボタンをクリックしてコネクタのテスト実行用の画面を開き、右上の「Launch test」ボタンをクリックして実行します。次のように、指定したテーブルの情報がJSON で返ってくれば成功です。
詳細と無料トライアル
これで、RunMyProcess からAPI のデータに接続できました。API や、その他250以上のデータソースのOData フィードを作成する方法は、API Server ページ を参照してください。無料トライアルにサインアップして、RunMyProcess からAPI のデータに連携してアプリを作成しましょう。