


SAPUI5 MVC Apps のAPI にリアルタイム連携を実現

この記事では、バックエンドデータベースに書き込むことなくAPI API の機能を活用するSAPUI5 アプリを作成するために、CData API Server およびADO.NET Provider for API (または250+ の他のADO.NET Providers) を使用する方法を説明します。API Server は、サーバー上で実行されてAPI のOData フィードを生成する軽量のWeb アプリケーションです。OData は、Web を介したリアルタイムデータアクセスの標準であり、SAPUI5 およびOpenUI5 にビルトインのサポートがあります。
API Server の設定
以下のリンクからAPI Server の無償トライアルをスタートしたら、セキュアなAPI OData サービスを作成していきましょう。
API への接続
SAPUI5 からAPI のデータを操作するには、まずyour API への接続を作成・設定します。
- API Server にログインして、「Connections」をクリック、さらに「接続を追加」をクリックします。
- 「接続を追加」をクリックして、データソースがAPI Server に事前にインストールされている場合は、一覧から「API」を選択します。
- 事前にインストールされていない場合は、コネクタを追加していきます。コネクタ追加の手順は以下の記事にまとめてありますので、ご確認ください。
CData コネクタの追加方法はこちら >> - それでは、API への接続設定を行っていきましょう!
-
To connect to your API, configure the following properties on the Global Settings page:
- In Authentication, select the Type and fill in the required properties
- In Headers, add the required HTTP headers for your API
- In Pagination, select the Type and fill in the required properties
After the configuring the global settings, navigate to the Tables to add tables. For each table you wish to add:
- Click "+ Add"
- Set the Name for the table
- Set Request URL to the API endpoint you wish to work with
")
- (Optional) In Parameters, add the required URL Parameters for your API endpoint
- (Optional) In Headers, add the required HTTP headers for the API endpoint
- In Table Data click " Configure"
- Review the response from the API and click "Next"
")
- Select which element to use as the Repeated Elements and which elements to use as Columns and click "Next"
")
- Preview the tabular model of the API response and click "Confirm"
")
- 接続情報の入力が完了したら、「保存およびテスト」をクリックします。
To connect to your API, configure the following properties on the Global Settings page:
- In Authentication, select the Type and fill in the required properties
- In Headers, add the required HTTP headers for your API
- In Pagination, select the Type and fill in the required properties
After the configuring the global settings, navigate to the Tables to add tables. For each table you wish to add:
- Click "+ Add"
- Set the Name for the table
- Set Request URL to the API endpoint you wish to work with
- (Optional) In Parameters, add the required URL Parameters for your API endpoint
- (Optional) In Headers, add the required HTTP headers for the API endpoint
- In Table Data click " Configure"
- Review the response from the API and click "Next"
- Select which element to use as the Repeated Elements and which elements to use as Columns and click "Next"
- Preview the tabular model of the API response and click "Confirm"
API Server のユーザー設定
次に、API Server 経由でAPI にアクセスするユーザーを作成します。「Users」ページでユーザーを追加・設定できます。やってみましょう。
- 「Users」ページで ユーザーを追加をクリックすると、「ユーザーを追加」ポップアップが開きます。
-
次に、「ロール」、「ユーザー名」、「権限」プロパティを設定し、「ユーザーを追加」をクリックします。

-
その後、ユーザーの認証トークンが生成されます。各ユーザーの認証トークンとその他の情報は「Users」ページで確認できます。

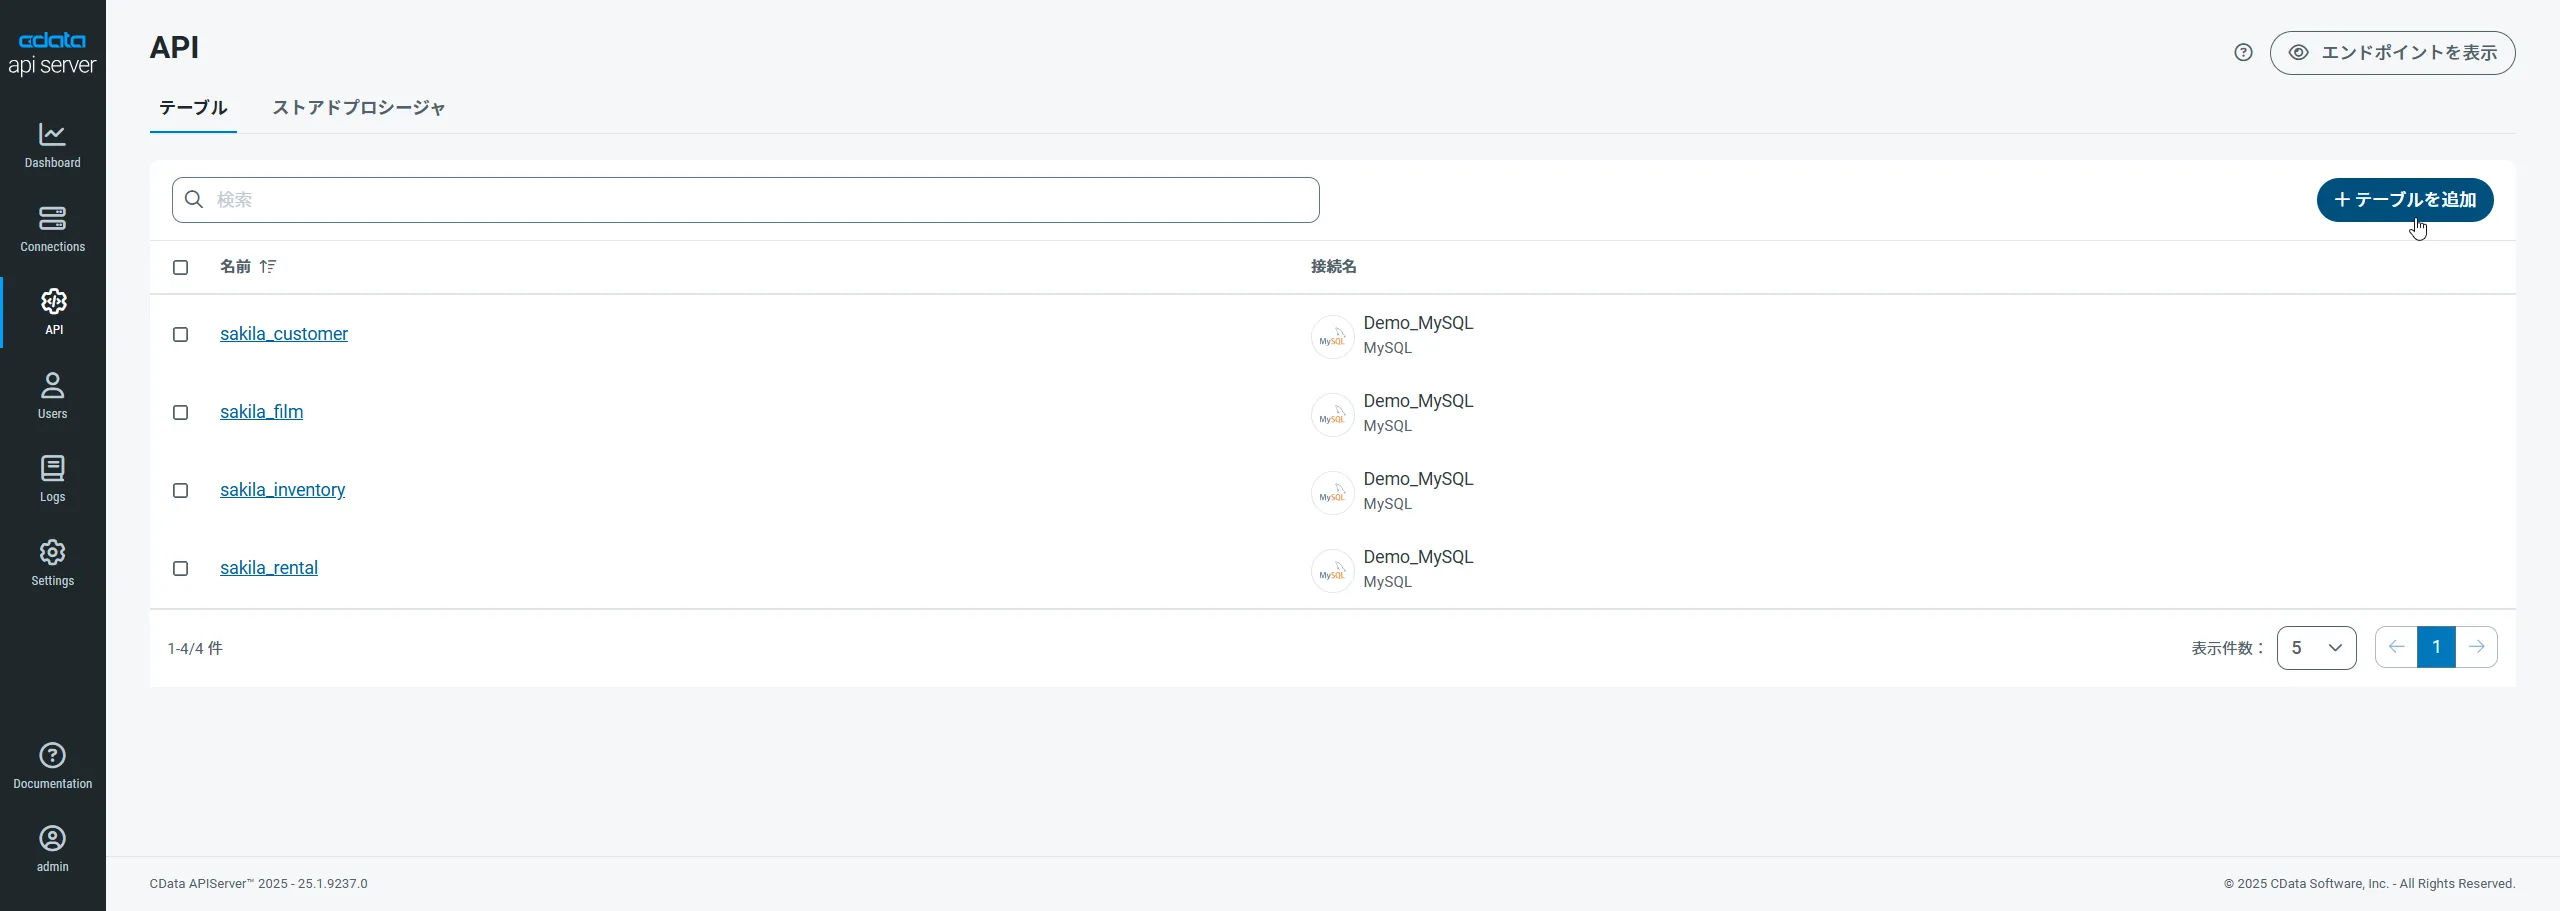
API 用のAPI エンドポイントの作成
ユーザーを作成したら、API のデータ用のAPI エンドポイントを作成していきます。
-
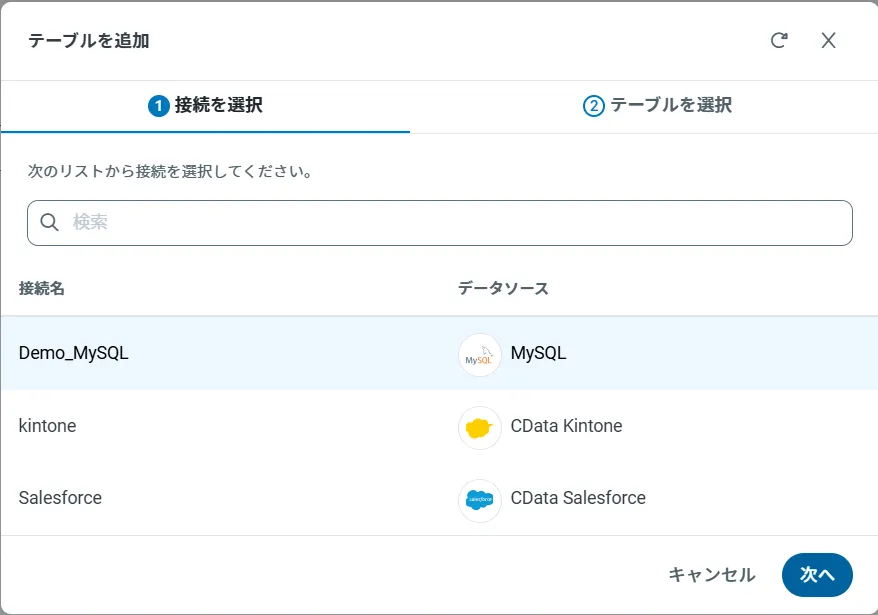
まず、「API」ページに移動し、
「 テーブルを追加」をクリックします。
-
アクセスしたい接続を選択し、次へをクリックします。
-
接続を選択した状態で、各テーブルを選択して確認をクリックすることでエンドポイントを作成します。

OData のエンドポイントを取得
以上でAPI への接続を設定してユーザーを作成し、API Server でAPI データのAPI を追加しました。これで、OData 形式のAPI データをREST API で利用できます。API Server の「API」ページから、API のエンドポイントを表示およびコピーできます。

ビューの作成
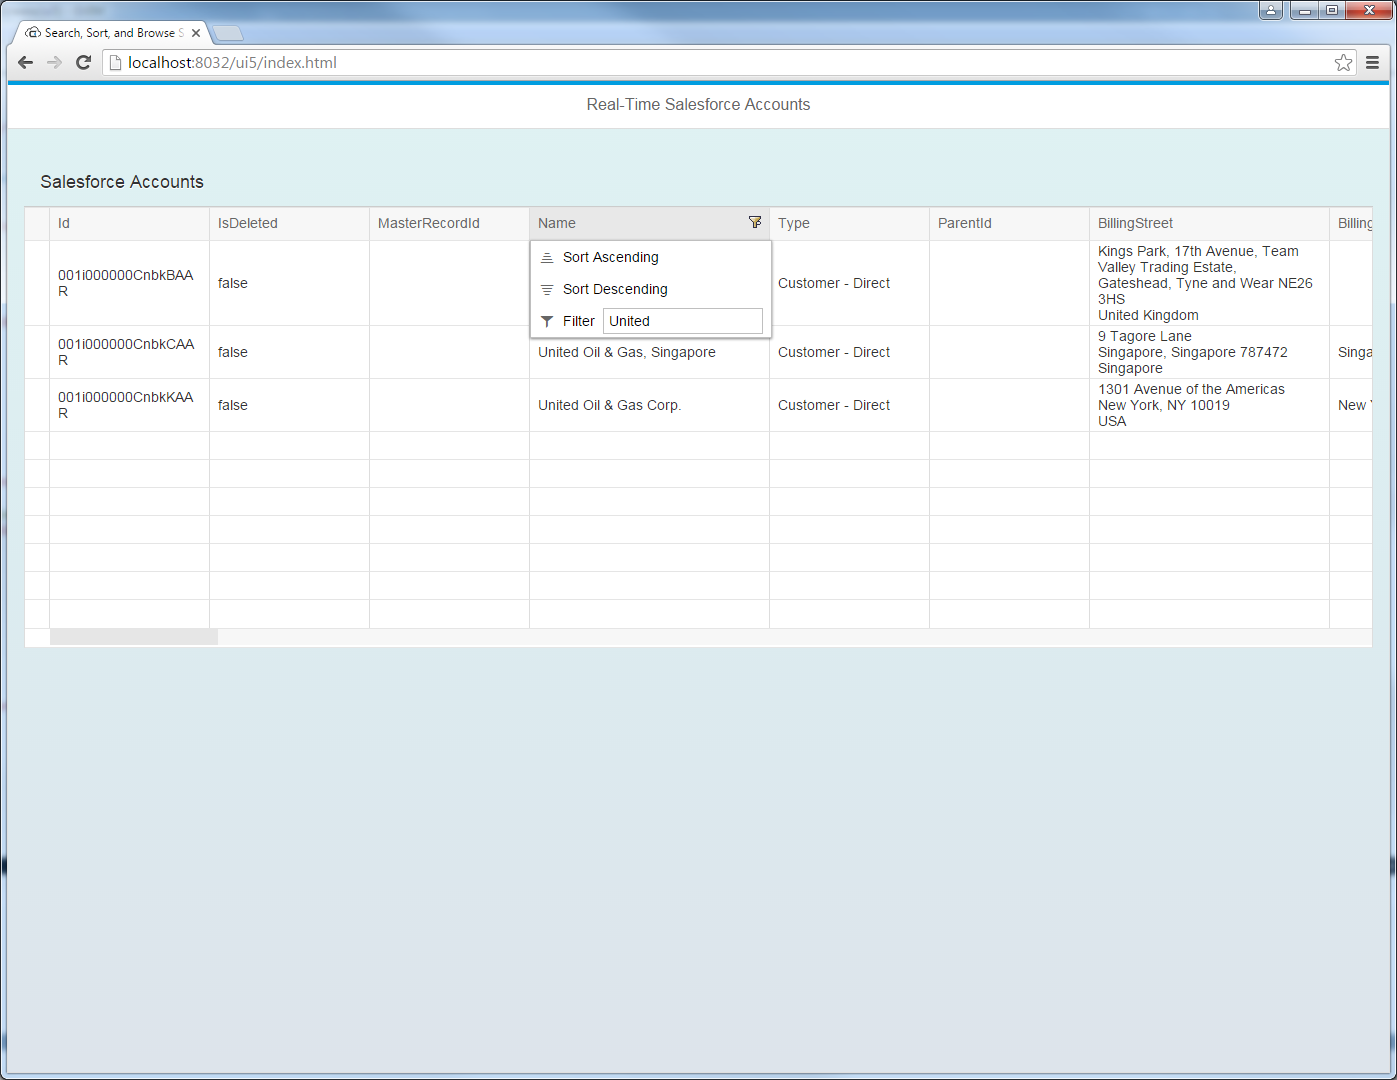
この記事では、ユーザーはSAPUI5 テーブルコントロールを介してAPI を表示および操作します。テーブルのカラムは、API Server のAPI エンドポイントから取得したメタデータから自動的に検出されます。次のテーブルを別のView.view.xml ファイルで定義します。
<mvc:View
  controllerName="sap.ui.table.sample.OData2.Controller"
  xmlns="sap.ui.table"
  xmlns:mvc="sap.ui.core.mvc"
  xmlns:u="sap.ui.unified"
  xmlns:c="sap.ui.core"
  xmlns:m="sap.m">
  <m:Page
    showHeader="false"
    enableScrolling="false"
    class="sapUiContentPadding">
    <m:content>
      <Table
        id="table"
        selectionMode="MultiToggle"
        visibleRowCount="10"
        enableSelectAll="false"
        rows="{/posts}"
        threshold="15"
        enableBusyIndicator="true"
        columns="{
          path: 'meta>/dataServices/schema/[${namespace}===\'CData\']/entityType/[${name}===\'posts\']/property',
          factory: '.columnFactory'
        }">
        <toolbar>
          <m:Toolbar>
            <m:Title text="API posts"></m:Title>
          </m:Toolbar>
        </toolbar>
        <noData>
          <m:BusyIndicator class="sapUiMediumMargin"/>
        </noData>
      </Table>
    </m:content>
  </m:Page>
</mvc:View>
モデルとコントローラーの作成
SAPUI5 では、OData クエリを作成する必要はありません。ODataModel インスタンスはアプリケーションのデータアクセスコマンドを処理します。 次に、API Server はクエリをAPI API 呼び出しに変換します。
コントローラーはユーザー入力を処理し、ビューを通じてユーザーに情報を表示します。新しいファイルであるController.controller.js でコントローラーを定義します。onInit 関数でモデルをインスタンス化します。API Server へのURL、API Server のOData エンドポイントへのアクセスを許可されたユーザー、そしてユーザーの認証トークンのプレースホルダー値を置き換える必要があります。
sap.ui.define([
  "sap/ui/core/mvc/Controller",
  "sap/ui/model/odata/v2/ODataModel",
  "sap/ui/model/json/JSONModel",
  "sap/ui/table/Column",
  "sap/m/Text",
], function(Controller, ODataModel, JSONModel, Column, Text ) {
  "use strict";


  return Controller.extend("sap.ui.table.sample.OData2.Controller", {

    onInit : function () {

      var oView = this.getView();
      var oDataModel = new ODataModel("http://myserver/api.rsc/",{user:"MyUser", password:"MyAuthToken"});

      oDataModel.getMetaModel().loaded().then(function(){
        oView.setModel(oDataModel.getMetaModel(), "meta");
      });
      oView.setModel(oDataModel);

      var oTable = oView.byId("table");
      var oBinding = oTable.getBinding("rows");
      var oBusyIndicator = oTable.getNoData();
      oBinding.attachDataRequested(function(){
      oTable.setNoData(oBusyIndicator);
      });
      oBinding.attachDataReceived(function(){
        oTable.setNoData(null); //use default again ("no data" in case no data is available)
      });
    },

    onExit : function () {
    },

    columnFactory : function(sId, oContext) {
      var oModel = this.getView().getModel();
      var sName = oContext.getProperty("name");
      var sType = oContext.getProperty("type");
      var iLen = oContext.getProperty("maxLength");
      iLen = iLen ? parseInt(iLen, 10) :10;

      return new Column(sId, {
        sortProperty: sName,
        filterProperty: sName,
        width: (iLen > 9 ? (iLen > 50 ?15 :10) :5) + "rem",
        label: new sap.m.Label({text: "{/#posts/" + sName + "/@name}"}),
        hAlign: sType && sType.indexOf("Decimal") >= 0 ?"End" :"Begin",
        template: new Text({text: {path: sName}})
      });
    }

  });

});
アプリケーションロジックの説明
アプリケーションのリソースを含むコンポーネントを作成します。Component.js で以下を定義します。
sap.ui.define([
  'sap/ui/core/UIComponent'
], function(UIComponent) {
  "use strict";

  return UIComponent.extend("sap.ui.table.sample.OData2.Component", {
    metadata : {
      rootView : "sap.ui.table.sample.OData2.View",
      dependencies : {
        libs : [
          "sap.ui.table",
          "sap.ui.unified",
          "sap.m"
        ]
      },

      config : {
        sample : {
          stretch : true,
          files : [
            "View.view.xml",
            "Controller.controller.js"
          ]
        }
      }
    }
  });

});
OpenUI5 をブーストラップして起動
MVC アプリケーションを完了するには、ブートストラップと初期化コードを追加します。これらをindex.html に直接追加します。
<!DOCTYPE HTML>

<html>
<head>
  <meta http-equiv="x-ua-compatible" content="ie=edge" />
  <meta charset="utf-8">
  <title>API posts</title>

  <script id="sap-ui-bootstrap"
    src="https://openui5.hana.ondemand.com/resources/sap-ui-core.js"
    data-sap-ui-libs="sap.m"
    data-sap-ui-theme="sap_bluecrystal"
    data-sap-ui-xx-bindingSyntax="complex"
    data-sap-ui-preload="async"
    data-sap-ui-compatVersion="edge"
    data-sap-ui-resourceroots='{"sap.ui.table.sample.OData2": "./", "sap.ui.demo.mock": "mockdata"}'>
  </script>

  <!-- application launch configuration -->
  <script>

      sap.ui.getCore().attachInit(function() {
        new sap.m.App ({
          pages: [
                new sap.m.Page({
                    title: "API posts",
                    enableScrolling : false,
                  content: [ new sap.ui.core.ComponentContainer({
                  height :"100%", name : "sap.ui.table.sample.OData2"
                })]
            })
          ]
      }).placeAt("content");
    });

  </script>
</head>
  <!-- UI Content -->
<body class="sapUiBody" id="content" role="application">
</body>
</html>
結果のSAPUI5 テーブルコントロールは、リモートAPI 内のテーブルへの変更を反映します。これで、現在のAPI を参照および検索できます。